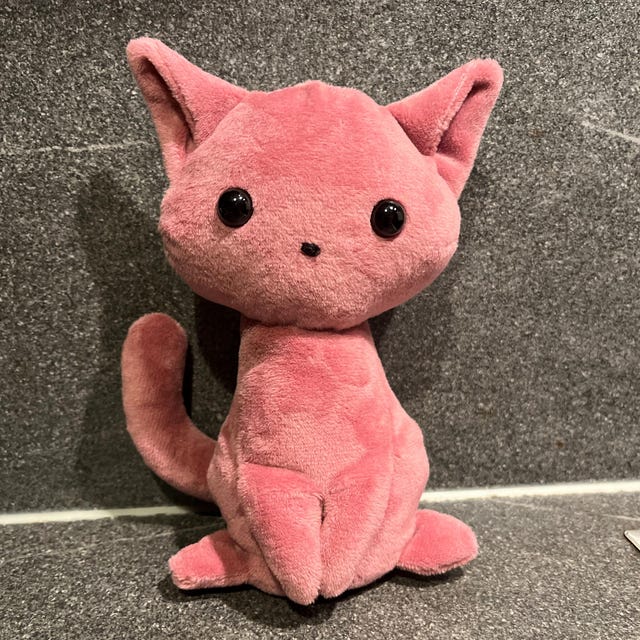
Do you want to create a cute cat plush toy that feels soft and special? Imagine holding a little furry friend made by your own hands.
Making your own plush toy is easier than you think, and it can bring you joy every time you see it. Whether you’re a beginner or just looking for a fun project, this guide will show you simple steps to craft your perfect cat plush.
Ready to make something adorable and unique? Keep reading, and let’s get started!
Materials Needed
Gathering the right materials is key to making a soft, cute cat plush toy. Choosing suitable fabric, stuffing, and sewing tools helps create a durable and cuddly toy. Keep your workspace organized to make the process smooth and enjoyable.
Fabric Choices
Select fabric that feels soft and is easy to sew. Cotton, fleece, and felt are popular options. Cotton is smooth and comes in many patterns. Fleece is warm and plush, perfect for a fluffy cat. Felt is sturdy and great for small details like eyes and nose. Pick colors that match your cat design. Avoid fabrics that fray easily or are too thin.
Stuffing Options
Use stuffing that keeps the plush soft and huggable. Polyester fiberfill is common and affordable. It is lightweight and holds shape well. Cotton stuffing is natural but can be denser. Foam beads add a fun texture and weight. Make sure the stuffing is clean and safe for children. Fill the toy evenly to avoid lumps.
Sewing Tools
- Needles: Choose sharp needles suitable for your fabric.
- Thread: Use strong thread matching your fabric color.
- Scissors: Sharp scissors help cut fabric neatly.
- Pins: Hold fabric pieces together during sewing.
- Measuring tape or ruler: Measure fabric pieces accurately.
- Fabric marker or chalk: Mark sewing lines clearly.
Credit: ohyaystudio.com
Designing Your Cat Plush
Designing your cat plush is a fun and creative part of making a toy. This stage lets you shape your plush’s look and feel. You decide the size, style, and details that make your cat unique. Careful design helps your plush look cute and charming. Take time to plan your design before cutting any fabric.
Choosing A Pattern
Start by picking a pattern that fits your skill level. Simple shapes work best for beginners. Patterns come in many styles: flat, 3D, or stylized cats. Choose one that matches the kind of plush you want. Look for patterns online or in craft books. You can also buy pre-made patterns or create your own. Check that the pattern pieces fit together well. A clear pattern will make sewing easier and neater.
Sketching Your Design
Draw your cat plush on paper before cutting fabric. Sketch the body shape, ears, tail, and face. Use simple lines and shapes for a clean design. Add details like eyes, nose, and whiskers. Decide on the plush’s size and proportions. Sketching helps you visualize the final toy. It also guides you when sewing. Keep your sketches handy during the project for quick reference.
Cutting The Fabric
Cutting the fabric is a crucial part of making your cat plush toy. Accurate cuts ensure all pieces fit perfectly during sewing. Take your time to prepare the fabric and tools. A neat cut means a neat plush toy.
Tracing The Pattern
Start by placing your pattern on the fabric. Use a fabric pencil or chalk for clear lines. Trace carefully around each piece. Keep the pattern flat to avoid mistakes. Mark any notches or details shown on the pattern. These marks help during assembly later.
Cutting Tips
- Use sharp fabric scissors for clean edges.
- Cut slowly and follow your traced lines exactly.
- Keep fabric flat and smooth to avoid uneven cuts.
- Cut all pieces in one session to keep shapes consistent.
- Handle small pieces with care to prevent fraying.
Sewing The Pieces
Sew the fabric pieces together, leaving a small opening. Ensure the stitches are tight for durability. Once sewn, turn the fabric inside out and stuff with filling to give shape.
Sewing the pieces of your cat plush toy brings your project to life. This step is where fabric transforms into something delightful, and your creativity takes shape. You’ll see your plush toy gradually resemble the charming cat you envisioned.Basic Stitches
Before diving into assembly, familiarize yourself with a few essential stitches. The running stitch is your go-to for seams, offering simplicity and strength. If you’re looking for added durability, try the backstitch, which provides a tighter hold. Another stitch to master is the ladder stitch, perfect for closing gaps invisibly. It’s a lifesaver when you want your plush toy to look seamless. Practicing these stitches on scrap fabric can boost your confidence.Assembling The Body
Start by sewing the body parts together, typically beginning with the head and body pieces. Align the fabric pieces with their right sides facing each other. Pin them carefully to avoid shifting as you sew. Use a running stitch to sew along the edges, leaving a small gap for stuffing. Remember to reverse stitch at the beginning and end to secure the thread. Once sewn, turn the pieces inside out to reveal the right side. Next, sew the limbs, ears, and tail in the same manner. These smaller pieces can be a bit tricky, so take your time and ensure all seams are secure. Now, ask yourself: does your cat plush toy need any extra features like a cute bow or collar?Adding Details
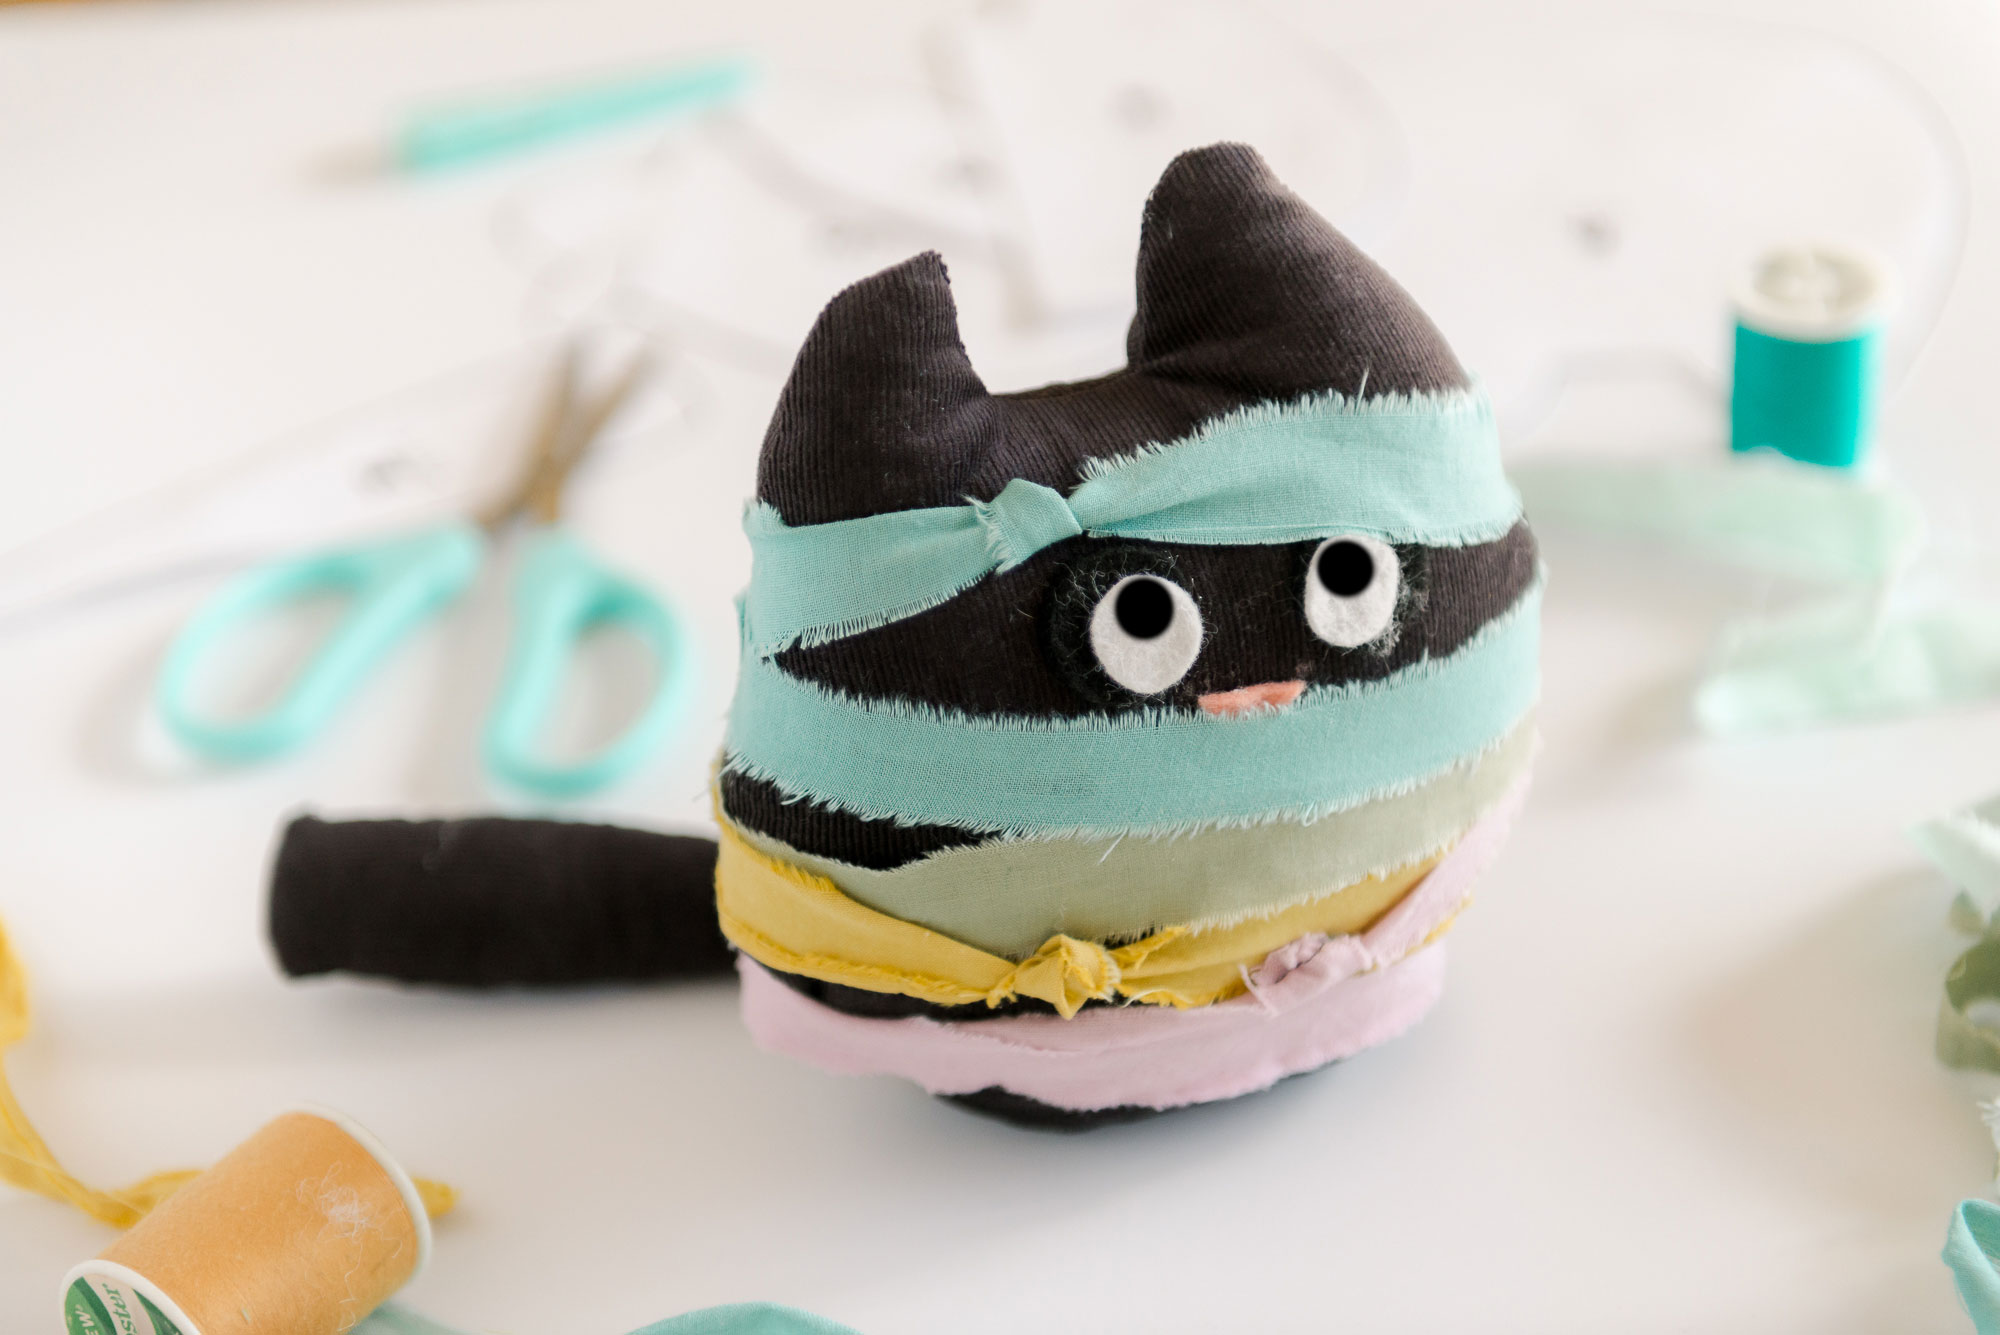
Adding details to your cat plush toy brings it to life. These small touches make your creation unique and expressive. Paying attention to features like eyes, nose, ears, and tail turns a simple shape into a charming companion.
Creating Eyes And Nose
Start by choosing the right materials for the eyes and nose. Felt, embroidery thread, or small buttons work well and are safe for kids. Using felt lets you cut out precise shapes, while embroidery adds texture and depth.
Sew or glue the eyes symmetrically on the face, about halfway down the head. Placing them too close or too far apart can change the plush’s personality. For the nose, a small triangle or oval shape in a contrasting color looks natural and cute.
Think about adding a little shine to the eyes with white embroidery or fabric paint. This tiny detail can make your cat look lively and curious. Have you ever noticed how eyes change the entire expression of a face?
Attaching Ears And Tail
Cut out ear shapes from the same fabric as the body or a slightly different texture for contrast. Position the ears at the top corners of the head, angled slightly outward. Secure them firmly with stitching so they stand up well.
The tail can be a simple elongated tube of fabric, stuffed lightly for shape. Attach it to the lower back of the plush with strong stitches. You might want to curve or bend the tail slightly to give your cat a playful pose.
Don’t forget to double-check your sewing to ensure durability. Loose ears or tails can frustrate anyone who loves to cuddle the toy. What kind of personality will your cat’s ears and tail suggest to its new owner?
Credit: ohyaystudio.com
Stuffing And Finishing
Stuffing and finishing are key to making your cat plush toy soft and cuddly. Proper stuffing gives the toy its shape and feel. Finishing touches keep everything neat and secure. This part makes the plush toy ready for hugs and play.
Filling The Plush
Choose a soft, lightweight stuffing material like polyester fiberfill. Stuff small amounts at a time. Press gently to spread the filling evenly. Avoid overstuffing to keep the toy flexible. Focus on filling the head and body first. Use extra stuffing for the paws and tail for better shape. Check the toy’s firmness often. Adjust stuffing to keep it soft but firm.
Sealing The Toy
Close the opening with small, tight stitches. Use a needle and thread that match the fabric color. Sew slowly to keep stitches even and neat. A ladder stitch works well for invisible seams. Knot the thread firmly at the end. Trim any loose threads carefully. Check the entire toy for gaps or weak spots. Reinforce any areas that need extra strength.
Personalizing Your Plush
Personalizing your cat plush toy brings it to life and makes it truly yours. This step lets you add unique touches that reflect your style or the personality of the cat you want to create. Think beyond just the shape—small details can turn a simple plush into a cherished keepsake.
Adding Accessories
Accessories give your plush character and charm. You can sew on tiny collars made from ribbon or felt, add little bows near the ears, or even craft miniature hats. These details don’t just decorate; they tell a story about your plush cat’s personality.
Consider using buttons, beads, or small bells to make your cat more playful. I once added a tiny bell collar to a plush, and it instantly made the toy feel more alive and interactive. What kind of personality do you want your plush cat to have?
Customizing Colors
Color plays a big role in how your plush looks and feels. Choose fabric colors that match a real cat you love or create a fantasy design with vibrant, unexpected hues. Don’t be afraid to mix textures and shades to add depth.
Try dyeing parts of the fabric or using fabric paint to add stripes, spots, or patches. When I experimented with soft pastels on a plush cat, it turned into a dreamy, whimsical piece that stood out on my shelf. How can color choices reflect your plush’s mood or character?

Credit: www.youtube.com
Care And Maintenance
Taking good care of your cat plush toy keeps it soft and cute for a long time. Proper care helps avoid dirt build-up and damage. Simple steps make cleaning and fixing easy. Regular attention keeps the plush looking fresh and new.
Cleaning Tips
Spot clean small stains with a damp cloth and mild soap. Avoid soaking the whole toy. For deeper cleaning, hand wash gently in cold water. Use a soft brush to clean stubborn dirt. Let the plush air dry completely, away from direct sunlight. Avoid using a dryer to keep the shape intact.
Repairing Small Damages
Check for loose threads or small holes often. Use a needle and thread to sew tears quickly. Match the thread color to keep repairs invisible. For loose eyes or buttons, use fabric glue or sew them tightly. Stuffing may need a little extra if the plush feels flat. Handle repairs right away to stop damage from growing.
Frequently Asked Questions
What Materials Are Needed To Make A Cat Plush Toy?
To make a cat plush toy, you need fabric, stuffing, thread, needles, scissors, and fabric markers. Soft fabrics like fleece or felt work best for a cuddly feel. Don’t forget safety eyes or buttons for the cat’s eyes, and optional decorations like ribbons.
How Do I Sew The Cat Plush Toy Pieces Together?
Cut out the cat pattern pieces from fabric. Sew them inside out to hide seams. Leave an opening to stuff the toy. After stuffing, sew the opening closed with small, neat stitches for a clean finish.
What Stuffing Works Best For A Cat Plush Toy?
Polyester fiberfill is the most popular stuffing for plush toys. It’s soft, lightweight, and hypoallergenic. Avoid heavy or hard fillers to keep the toy cuddly and safe for kids. You can also use cotton or scrap fabric as alternatives.
How Can I Make My Cat Plush Toy More Durable?
Use strong, tight stitches and quality fabric to ensure durability. Reinforce stress points like ears and limbs with extra stitching. Avoid loose threads and securely attach all parts to prevent wear and tear over time.
Conclusion
Creating a cat plush toy is fun and rewarding. You just need basic materials and simple steps. Each stitch brings your toy to life. Personalize it with colors and shapes you like. Handmade toys show care and creativity. Enjoy making one for yourself or as a gift.
Keep practicing to improve your sewing skills. Soon, you’ll create even cuter plush toys. Don’t rush; take your time and have fun. Crafting this way makes your work special. Try it today and feel proud of your creation.


Leave a Reply