Do you want to make something special for your cat that’s fun and safe? Crocheting a cat toy is easier than you think, even if you’ve never tried it before.
Imagine giving your furry friend a handmade toy that keeps them entertained for hours. In this guide, you’ll learn simple steps to crochet a cat toy that your pet will love. Ready to create something unique with your own hands?
Keep reading, and let’s get started!
Materials Needed
Gathering the right materials is the first step toward making a cat toy that your furry friend will love. Choosing items carefully ensures your project is safe, durable, and fun. Let’s look at what you’ll need to get started.
Choosing The Right Yarn
Pick a yarn that’s soft but sturdy enough to handle playful bites and claws. Cotton yarn works well because it’s natural, strong, and easy to clean. Avoid yarns that shed easily or have a strong chemical smell—your cat’s safety comes first.
Have you noticed how some yarns break apart quickly? That’s a sign to switch to a more durable option. Bright colors can also catch your cat’s attention, making the toy more exciting for them.
Essential Crochet Tools
You don’t need much beyond basic crochet tools to make a cat toy. A crochet hook sized to your yarn, scissors, and a yarn needle to weave in ends are must-haves. Make sure your scissors are sharp to cut yarn cleanly without fraying.
Keeping your tools organized helps you stay focused. A small project bag or container can prevent losing tiny pieces like needles or stitch markers.
Optional Add-ons For Fun
Consider adding small extras to make the toy more engaging. Bells, feathers, or catnip can turn a simple crochet piece into an irresistible plaything. Just be sure any add-ons are securely attached to avoid choking hazards.
Have you ever seen a cat go wild for a toy with a tiny bell inside? Adding sensory elements can make a huge difference in keeping your pet entertained for longer.
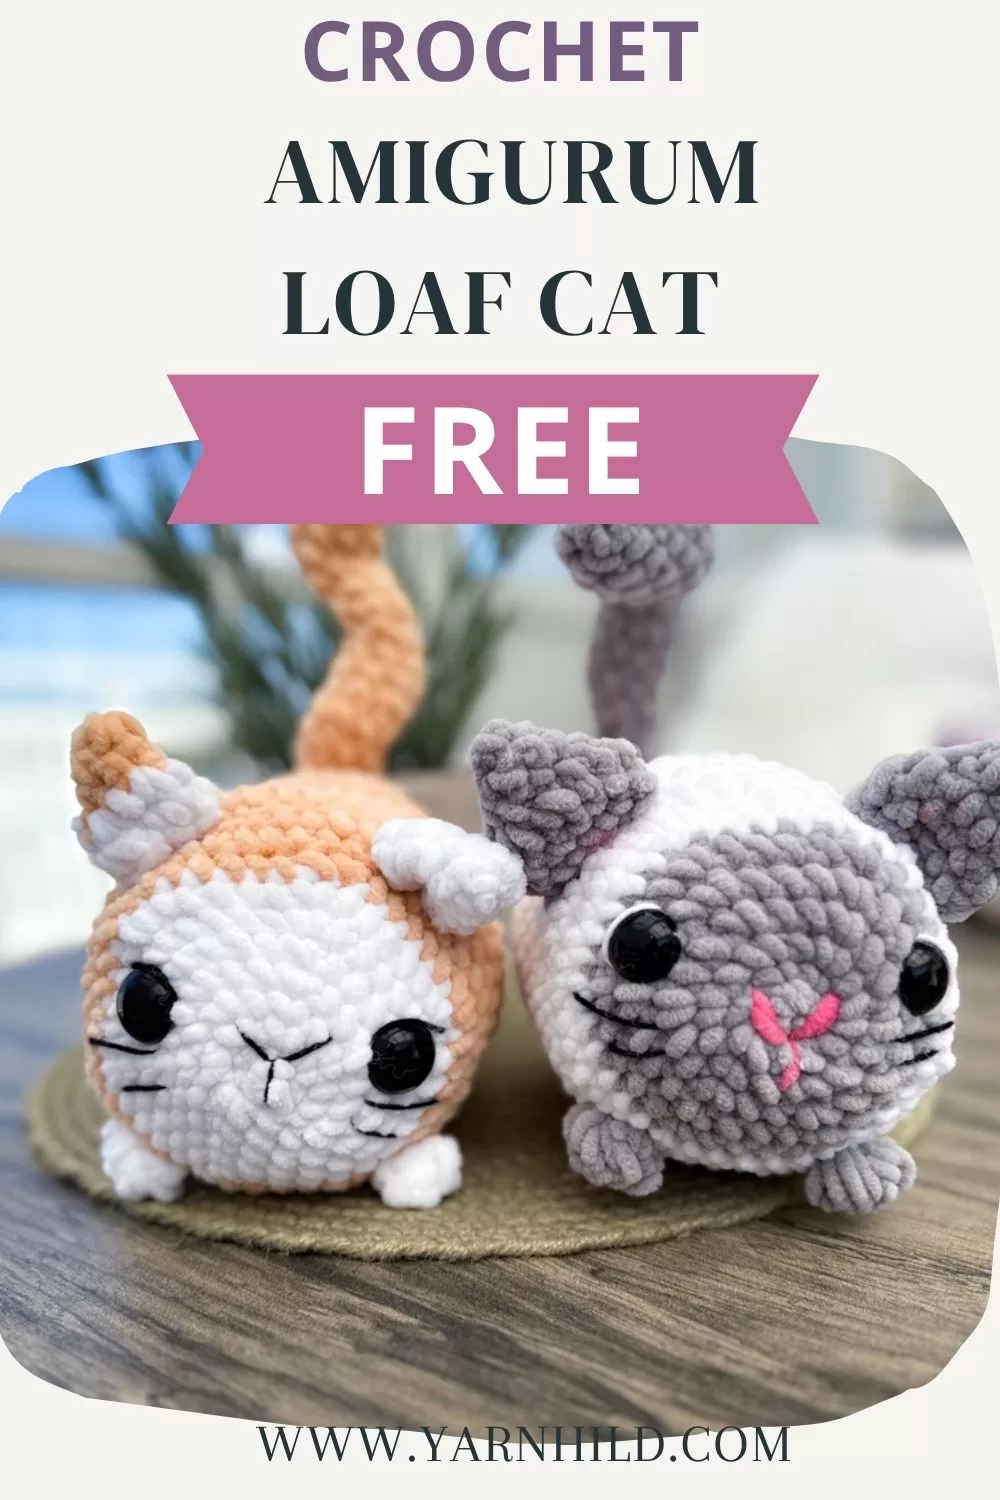
Credit: yarnhild.com
Basic Crochet Stitches
Mastering a few basic crochet stitches is key to creating a fun and durable cat toy. These stitches form the foundation of your project and help you shape the toy just right. You don’t need to be an expert; even simple stitches can create something your cat will love.
Chain Stitch
The chain stitch is the starting point for most crochet projects. It creates a flexible foundation row that you build upon. Imagine it as the backbone of your cat toy—without a strong chain, the toy won’t hold together well.
To make a chain stitch, wrap the yarn around your hook and pull it through the loop on your hook. Repeat this to reach the desired length. Try making a few chains to get comfortable with the tension—too tight or too loose affects the toy’s shape.
Single Crochet
Single crochet is one of the simplest yet strongest stitches you can use. It creates a tight, dense fabric, perfect for withstanding your cat’s sharp claws and playful bites. This stitch will give your toy durability and a nice texture that cats enjoy.
To single crochet, insert the hook into a stitch, yarn over, pull through, yarn over again, and pull through both loops on the hook. Practice this until your rows look even and neat. Notice how this stitch thickens your fabric—it’s exactly what you need for a sturdy toy.
Slip Stitch
The slip stitch is a subtle but powerful tool for finishing your project or joining parts. It’s the stitch you use to close gaps or create smooth edges. This stitch won’t add height but will keep your work neat and secure.
Make a slip stitch by inserting the hook into the stitch, yarn over, and pulling through both the stitch and the loop on your hook in one motion. It’s fast and easy, perfect for tying off or moving your yarn without adding bulk. Have you tried using slip stitches to create interesting shapes or textures in your crochet projects?
Creating The Toy Base
Creating the toy base is the first and most important part of making a crochet cat toy. This base will give the toy its shape and size. Starting with a strong foundation makes the rest of the project easier and neater. You will learn simple crochet techniques to form a small, round shape that cats love to play with.
Starting The Magic Ring
The magic ring helps you start crocheting in the round. It creates a tight circle with no hole in the middle. To make a magic ring:
- Wrap the yarn around your fingers to form a loop.
- Insert the hook into the loop and pull the yarn through.
- Chain one stitch to secure the loop.
- Work the first round of stitches inside the loop.
Pull the yarn tail to close the ring tightly. This makes a neat and strong start for the toy base.
Building The Shape
After the magic ring, keep crocheting in rounds. Each round adds stitches to grow the shape. Use single crochet stitches for a firm texture. The toy base should be small but thick enough to hold stuffing later.
Focus on keeping your stitches even. This helps the base look smooth and well-made. Count your stitches each round to avoid mistakes.
Increasing And Decreasing
To shape the toy base, add or remove stitches in some rounds. Increasing means making the base wider. Do this by adding two stitches in one stitch. This creates a gentle curve outward.
Decreasing means making the base narrower. Crochet two stitches together to reduce stitch count. This shapes the toy into a round or oval form. Balance increases and decreases to keep the base smooth.
Adding Texture And Details
Textures and small details make the cat toy more fun and interesting. Use different stitches or add small pieces like ears and tails to create shape and feel. This makes the toy more attractive for your cat to play with.
Adding texture and details to your crochet cat toy makes it more fun. Cats love toys with interesting textures and sounds. Simple additions can transform a basic crochet piece into an exciting plaything. Let’s explore some easy ways to enhance your toy.Crocheting Ears And Tail
Ears and tails bring character to the cat toy. Use a contrasting yarn color for these parts. This adds visual interest. To crochet ears, create small triangles. Attach them securely to the toy’s head. For the tail, crochet a long, thin piece. Attach it to the toy’s body. Make sure all parts are firmly attached. Safety is key for your playful pet.Attaching Bells Or Rattles
Bells or rattles make toys more exciting. Sew a small bell inside the toy. This adds a fun sound when it moves. Ensure the bell is well secured. Use sturdy thread and tight stitching. You can also add a rattle. Place a small rattle inside before closing the toy. These sounds will keep your cat entertained.Using Color Patterns
Color patterns make toys visually appealing. Use two or three colors for striking effects. Stripes are easy to create. Alternate colors every few rows while crocheting. You can also make spots or patches. Change yarn colors for different sections. This adds variety and keeps your crochet project exciting.Finishing Touches
Finishing touches are what transform your crocheted cat toy from a simple creation to a durable and lovable plaything. Paying attention to these details ensures the toy stays intact during your cat’s playful attacks. These final steps also give you a chance to add your personal flair and make your project truly unique.
Stuffing The Toy
Choose a soft, lightweight stuffing that’s safe for pets, like polyester fiberfill. Avoid materials that could cause harm if your cat chews through the toy.
Stuff the toy firmly but not too tight. You want it to be squishy enough for your cat to enjoy but sturdy enough to keep its shape.
As you stuff, check for lumps or uneven areas. Smooth them out by adjusting the filling, so your toy feels consistent all over.
Closing The Toy Neatly
Use a yarn needle and matching yarn to sew the opening closed. Keep your stitches small and tight to prevent the stuffing from escaping.
Make sure your closing seam is secure but tidy. A messy closure not only looks unfinished but can unravel quickly during playtime.
Ask yourself: Would you want this toy to fall apart after a few uses? Taking your time here ensures it won’t.
Securing Loose Ends
After closing the toy, look for any loose yarn ends. These can unravel or become a choking hazard if left unattended.
Weave each loose end back into the stitches using your yarn needle. This hides them and locks them in place for durability.
Don’t rush this step. Securing your ends properly makes your toy last longer and safer for your furry friend.
Safety Tips For Cat Toys
Keeping your cat safe while enjoying homemade toys is key. Cat toys might seem harmless, but some materials and designs can pose risks. Paying close attention to safety ensures your furry friend stays happy and healthy while playing with the toy you made.
Choosing Safe Materials
Pick yarns and fabrics that are non-toxic and durable. Natural fibers like cotton or wool work well because they are less likely to irritate your cat’s skin or cause allergies.
Steer clear of materials with loose fibers or harmful dyes that could be swallowed. Have you ever seen your cat chewing on something and wondered if it’s safe? Your choice of materials can make all the difference.
Avoiding Small Parts
Small beads, buttons, or bells might look cute but can be choking hazards. Instead, create texture and sound using safe stitching techniques or tightly secured yarn knots.
Think about how your cat plays—do they chew or swallow small pieces? Eliminating tiny detachable parts prevents accidental ingestion and keeps playtime worry-free.
Regular Toy Inspection
Check your cat toys regularly for loose threads or damage. Even the sturdiest toys can wear down after enthusiastic play sessions.
Set a reminder to inspect toys weekly. This habit helps you catch problems early and repair or retire toys before they become unsafe.
Creative Variations
Exploring creative variations adds fun to crocheting cat toys. It lets you tailor toys to your cat’s unique personality and preferences. Changing shapes, sizes, and textures keeps your cat curious and entertained. Small changes can make each toy special and exciting for your furry friend.
Different Shapes And Sizes
Crochet cat toys come in many shapes. Try balls, mice, fish, or simple knots. Each shape gives a different feel and play style. Vary sizes from tiny to larger for different play moods. Smaller toys are easy to bat and carry. Larger ones are good for cuddling or tossing.
Incorporating Catnip
Catnip makes toys more appealing to cats. Stuff a small pouch of catnip inside the toy. Use dried catnip or catnip spray for extra scent. Ensure the catnip is fresh and safe. Avoid overfilling to keep the toy soft and light. Catnip encourages playful behavior and keeps cats interested longer.
Personalizing With Embellishments
Personal touches add charm to your toys. Sew on small buttons or felt shapes for eyes and noses. Add colorful yarn tails or whiskers for more fun. Use soft ribbons or bells for sound and texture. Make sure all parts are securely attached. Personalization makes each toy unique and inviting.

Credit: www.youtube.com

Credit: m.youtube.com
Frequently Asked Questions
What Materials Do I Need To Crochet A Cat Toy?
You need yarn, a crochet hook, stuffing, and scissors. Choose soft, non-toxic yarn safe for cats. Use a hook size that matches your yarn weight for best results.
How Long Does It Take To Crochet A Cat Toy?
For beginners, it usually takes 1 to 2 hours. This depends on your crochet skill and the toy’s complexity. Simple patterns are quicker, making it ideal for first-timers.
Can I Use Any Yarn For Cat Toys?
Choose yarn that is durable and safe for cats. Avoid toxic or loosely spun yarn that can unravel easily. Cotton or acrylic yarns are popular, safe choices for cat toys.
How Do I Make The Toy Safe For My Cat?
Secure all parts tightly to prevent choking hazards. Avoid small detachable pieces and use pet-safe stuffing. Inspect the toy regularly for wear and tear before giving it to your cat.
Conclusion
Crocheting a cat toy is fun and simple for beginners. You only need basic materials and easy steps. Handmade toys can keep your cat happy and active. Try different shapes and colors to see what your cat likes. Practice will make your stitches neater over time.
Enjoy the process and share your creations with friends. Small efforts bring big smiles to your furry friend. Start today and watch your cat play with joy.

Leave a Reply