If you’re a cat owner, you know how tricky it can be to keep your furry friend calm during grooming sessions. Having the right tools can make all the difference—and that includes a specially designed cat grooming bag.
Imagine a bag that keeps your cat safe, comfortable, and still, while giving you easy access to all your grooming supplies. You’ll learn exactly how to make your own cat grooming bag step by step. By the end, you’ll have a simple, effective solution that makes grooming less stressful for both you and your cat.
Ready to make grooming time easier? Let’s get started!

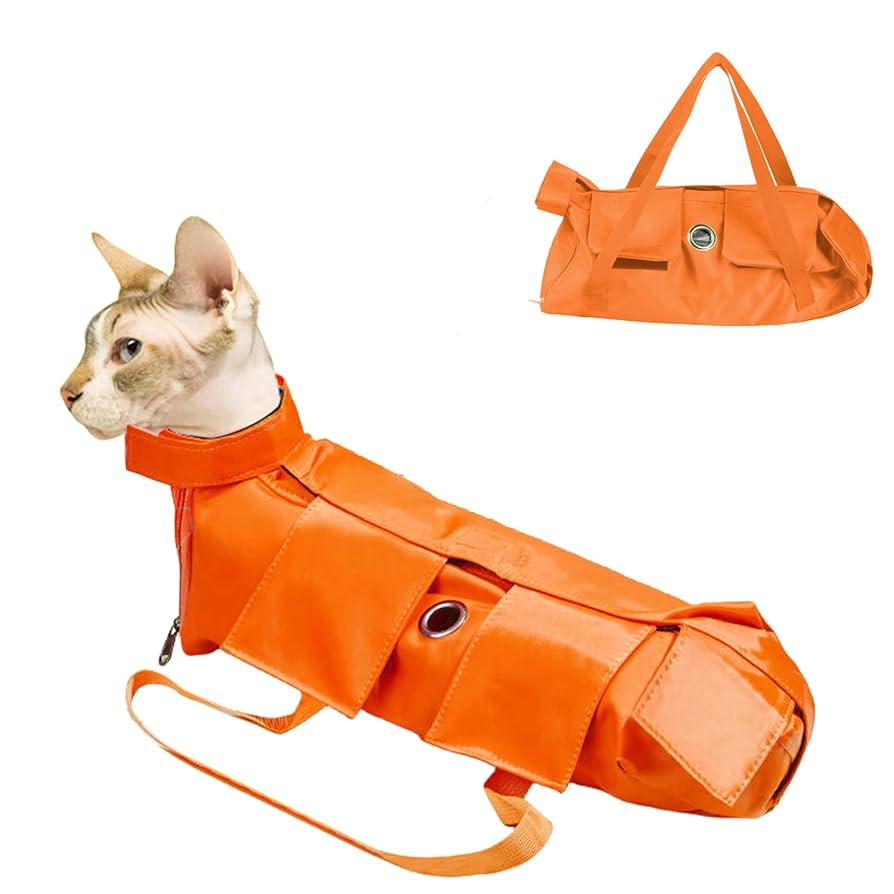
Credit: www.sears.com
Materials Needed
Gathering the right materials is key to making a practical cat grooming bag. Choose supplies that are durable and easy to clean. The bag should be comfortable for both you and your cat. Consider the size and strength of the fabric. Select tools that help with precise sewing and assembly. Optional accessories can improve the bag’s function and style.
Choosing The Fabric
Select a fabric that resists stains and water. Canvas and nylon are strong choices. These fabrics hold up well under use. Soft lining inside the bag adds comfort for your cat. Avoid fabrics that are too thin or delicate. The fabric color should hide dirt well.
Essential Tools
- Sewing machine or needle and thread for hand sewing
- Scissors sharp enough for fabric
- Measuring tape or ruler for accuracy
- Pins or clips to hold fabric pieces together
- Chalk or fabric marker for marking cuts
- Zippers or Velcro for secure closures
Optional Accessories
- Extra pockets for brushes and nail clippers
- Adjustable straps for easy carrying
- Mesh panels for ventilation
- Waterproof lining for spills
- Decorative patches or embroidery for style
Designing Your Bag
Designing your cat grooming bag is where creativity meets functionality. This stage lets you tailor the bag to your exact needs, making grooming sessions smoother. Thoughtful design ensures you carry everything without hassle and keep your hands free when needed.
Selecting The Size
Choosing the right size for your grooming bag is crucial. Think about how many tools you usually carry—clippers, brushes, nail trimmers, and maybe treats. A bag too small will leave you cramming items, while one too large can be bulky and awkward.
Consider a medium-sized bag that fits comfortably on your shoulder or can be carried by hand. Have you noticed how some bags become a burden just because they’re oversized? Pick a size that balances capacity with ease of carrying.
Planning Pockets And Compartments
Organizing your grooming supplies in pockets and compartments saves time and stress. Separate spaces for scissors, combs, and nail files prevent damage and make items easy to find. Think about adding a waterproof pocket for wet wipes or cleaning cloths.
Do you want quick access to your favorite brush? Design a front pocket for it. Small zippered compartments are perfect for storing treats or small accessories securely. Visualize the bag as your grooming command center—everything has a spot, so you’re always ready.
Cutting The Fabric
Cutting the fabric is a crucial step in making a cat grooming bag. This stage shapes the bag and ensures all pieces fit perfectly. Accuracy during cutting affects the bag’s final look and function.
Measuring And Marking
Start by measuring the fabric according to your pattern. Use a ruler or measuring tape for precise dimensions. Mark the fabric with chalk or a fabric pen. Make sure the marks are clear but easy to remove later.
Double-check all measurements before cutting. Mark all edges and important points like pockets or straps. This helps avoid mistakes and saves fabric.
Tips For Accurate Cutting
- Place the fabric on a flat, clean surface.
- Use sharp fabric scissors for smooth cuts.
- Cut slowly along the marked lines to stay precise.
- Hold the fabric steady with one hand while cutting.
- Cut multiple layers only if they are perfectly aligned.
- Keep your tools clean and free from sticky residues.
Careful cutting leads to a neat, professional-looking grooming bag. Take your time and focus on accuracy.
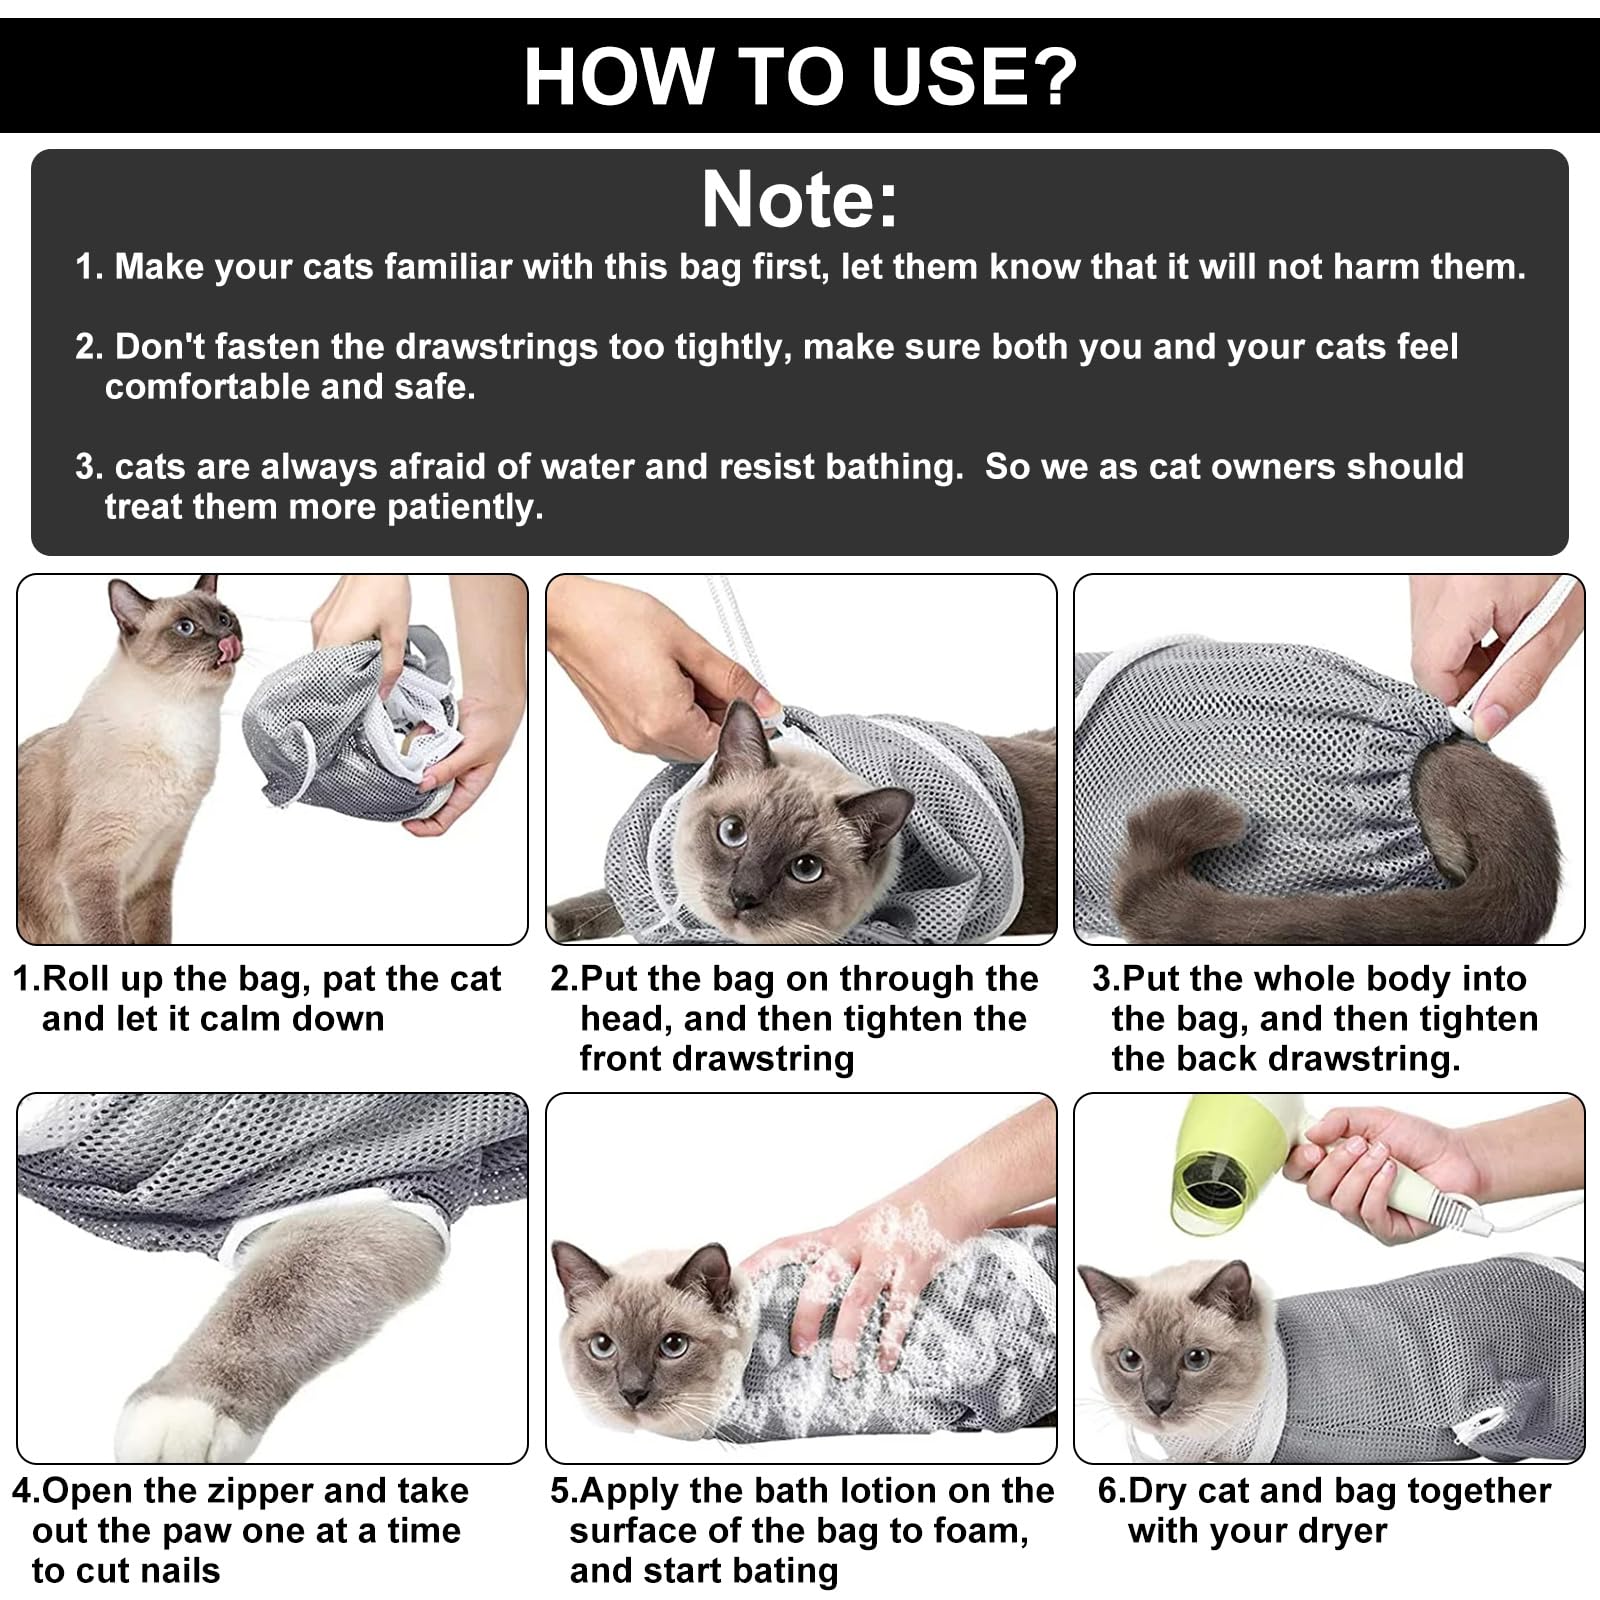
Credit: www.amazon.co.uk
Sewing The Bag
Sew the pieces of fabric carefully, joining edges with straight stitches for strength. Reinforce corners and handles to hold your cat’s grooming tools securely. Ensure seams are tight to prevent wear and tear during use.
Creating a cat grooming bag can be both a practical and rewarding project. With the right materials and a bit of patience, you can make a durable and functional accessory for your feline friend. Here’s how you can sew your own cat grooming bag.Assembling The Main Body
Begin by cutting your fabric to the desired size for the main body of the bag. Consider using a sturdy material like canvas for durability. Once you have your pieces, pin them together with the right sides facing each other. Sew along the edges, leaving the top open. Turn the fabric right side out and press the seams flat with an iron. Have you chosen a playful cat-themed fabric yet? It’s a delightful way to add personality to your bag.Adding Pockets
Pockets are essential for storing grooming tools and treats. Cut additional fabric pieces for the pockets, ensuring they are slightly larger than the items you plan to store. Fold the edges of each pocket piece and sew them down to prevent fraying. Attach the pockets to the exterior of the bag using a straight stitch. Position the pockets strategically, so everything is within easy reach when you need it.Attaching Straps And Closures
For portability, you’ll need sturdy straps. Measure and cut two lengths of strong webbing or fabric for handles. Sew the ends of each strap securely to the inside of the bag’s top edges. Consider adding a closure to keep everything secure. Velcro strips or magnetic snaps are easy to apply and offer convenience. As you sew these on, ensure they align properly when the bag is closed. Have you thought about the convenience this bag will bring to your grooming routine? Each element you add makes your cat grooming bag uniquely yours and tailored to your needs. Enjoy the process and the satisfaction that comes with creating something functional and beautiful.Customizing And Finishing
Customizing and finishing your cat grooming bag adds personality and strength. These steps ensure the bag looks great and lasts long. Simple details make a big difference in both style and function.
Adding Decorative Elements
Choose decorations that match your style. Use fabric paint, patches, or iron-on transfers for flair. Sew on buttons or ribbons for texture. Keep decorations pet-safe and avoid small parts that can fall off. Bright colors or fun patterns make the bag easy to spot.
Reinforcing Seams
Strong seams keep your bag sturdy and reliable. Double stitch all stress points, like handles and zippers. Use a heavy-duty thread for extra support. Consider adding fabric tape inside seams to prevent fraying. Reinforcement prevents tearing during use or travel.
Final Touches For Durability
Add extra lining inside the bag for protection. Use water-resistant fabric if possible. Attach sturdy zippers or closures that open smoothly. Test all parts before use to ensure they hold well. Proper finishing keeps your grooming bag working well over time.
Using Your Grooming Bag
Using your cat grooming bag makes grooming sessions easier and stress-free. Keep your tools ready and close at hand. A well-packed bag saves time and reduces hassle. It helps you focus on your cat’s comfort during grooming. Proper use keeps everything clean and organized. Here are some tips to use your grooming bag effectively.
Organizing Grooming Tools
Sort your grooming tools by type and size. Use small pockets for brushes, combs, and nail clippers. Store scissors and trimmers in secure compartments. Keep wipes and towels in easy-to-reach areas. Group similar items together to find them fast. Clean your tools before placing them back. This keeps your bag neat and hygienic.
Tips For Easy Transport
Choose a bag with comfortable straps or handles. Pack only what you need for each session. Use lightweight containers inside the bag for extra order. Close zippers and pockets tightly to avoid spills. Carry the bag close to your body for balance. Store the bag in a dry place after use. This keeps your tools safe and ready for next time.

Credit: www.amazon.com
Frequently Asked Questions
What Materials Are Needed To Make A Cat Grooming Bag?
You need durable fabric, strong zippers, mesh panels, and soft padding. Include adjustable straps and secure closures for safety. These materials ensure comfort and easy cleaning during grooming sessions.
How To Choose The Right Size For A Grooming Bag?
Measure your cat’s length and height accurately. Add extra space for movement without being too loose. A well-fitted bag keeps your cat calm and secure during grooming.
Can I Customize My Cat Grooming Bag?
Yes, you can add pockets, extra padding, or ventilation windows. Customizing improves convenience and comfort. Personal touches also make the bag uniquely suited to your cat’s needs.
How To Clean And Maintain A Cat Grooming Bag?
Use mild detergent and warm water for hand washing. Avoid harsh chemicals to protect fabric and your cat’s skin. Regular cleaning prevents odors and keeps the bag hygienic.
Conclusion
Making a cat grooming bag is simple and useful. It keeps all tools in one place. You save time and stay organized. Your cat feels calm with familiar items nearby. Use soft materials and sturdy zippers for comfort. Add pockets to hold brushes and combs safely.
This small project helps you care for your pet better. Try making your own bag today. Enjoy easier grooming and happy cats.

Leave a Reply