Are you looking for a fun and creative way to keep your cat entertained? Making felted wool cat toys is easier than you think, and your furry friend will love them!
Not only are these toys safe and natural, but you also get the satisfaction of crafting something special just for your pet. In this guide, you’ll discover simple steps to create colorful, durable toys that will keep your cat engaged for hours.
Ready to turn wool into playtime magic? Let’s dive in!
Materials Needed
Gathering the right materials makes crafting felted wool cat toys easy and fun. Choose quality supplies to ensure the toys are safe and durable. Prepare a clean workspace with all items close by. This saves time and keeps your project organized.
Types Of Wool
- Merino wool – soft, easy to felt, and gentle on cats
- Corriedale wool – slightly coarser, good for firmer toys
- Romney wool – durable, holds shape well during felting
- Wool roving – unspun wool ideal for needle felting
- Carded wool – prepared wool fibers ready for felting
Additional Supplies
- Felting needles – specially designed needles for shaping wool
- Foam pad or felting mat – protects surfaces and needles
- Scissors – for trimming loose fibers and shaping toys
- Embroidery thread – to add details or secure parts
- Catnip – to make toys more attractive to cats
- Small bells or beads – optional, adds sound for play
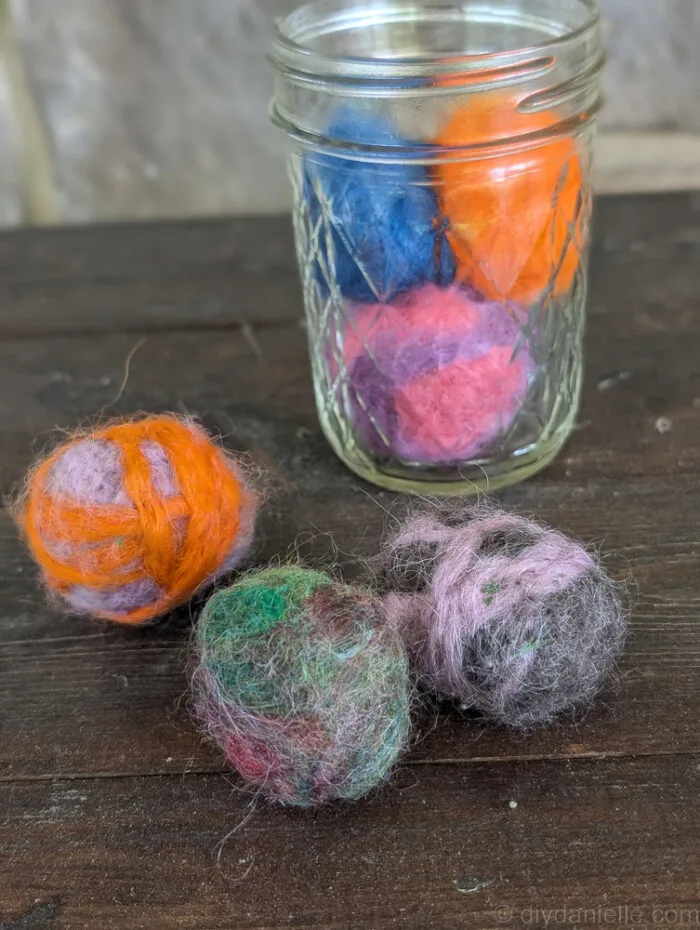
Credit: diydanielle.com
Preparing The Wool
Preparing the wool is a crucial step in making felted wool cat toys. How you choose and arrange your wool will directly affect the texture, durability, and appearance of the final toy. Paying attention to these details ensures your cat toy is not only fun but also safe and long-lasting.
Selecting Wool Colors
Choosing the right colors can make your cat toy visually appealing. Think about what catches your cat’s eye—bright reds, calming blues, or natural earth tones. You might want to mix a few colors to create interesting patterns or stick to one shade for a minimalist look.
Consider the source of your wool as well. High-quality wool feels softer and felts better, which means your toy will be more durable. Have you noticed how some wools hold their color better after washing? Picking wool that doesn’t fade quickly keeps your toy looking fresh.
Wool Arrangement Techniques
How you layer and arrange your wool affects the strength and design of your toy. Start with a thin base layer to create a sturdy foundation. Then add thicker layers or different colors on top to build up the shape and design.
Try laying the fibers in alternating directions to prevent weak spots. This simple trick can make your toy last longer during playtime. Have you experimented with blending colors by overlapping fibers? It creates smooth transitions that make the toy look professionally made.
Felting Methods
Start by shaping wool fibers using wet felting or needle felting techniques to create soft, durable cat toys. Both methods allow easy crafting of small, colorful shapes that cats love to play with. Felting transforms loose wool into firm, fun objects perfect for pets.
Creating felted wool cat toys is a delightful endeavor that combines creativity with practicality, ensuring your feline friend has a durable and engaging plaything. Understanding the felting methods can transform a simple ball of wool into a beloved toy. Let’s dive into two popular felting techniques: wet felting and needle felting.Wet Felting Steps
Wet felting is an enjoyable and tactile process. It involves using water, soap, and agitation to bind wool fibers together. – Gather Materials: Start with wool roving, warm water, and a small amount of dish soap. – Shape the Wool: Form the wool into a loose ball with your hands. – Add Soap and Water: Wet the ball with warm water and add a few drops of soap. The soap helps the fibers stick together. – Roll and Agitate: Gently roll the wool between your palms. As it starts to firm up, apply more pressure to ensure the fibers interlock. – Rinse and Shape: Rinse the soap out with cold water, then reshape if necessary. Let it dry completely before handing it over to your cat. The magic of wet felting lies in its simplicity. Who would have thought that just a little soap and water could transform loose fibers into a solid toy?Needle Felting Basics
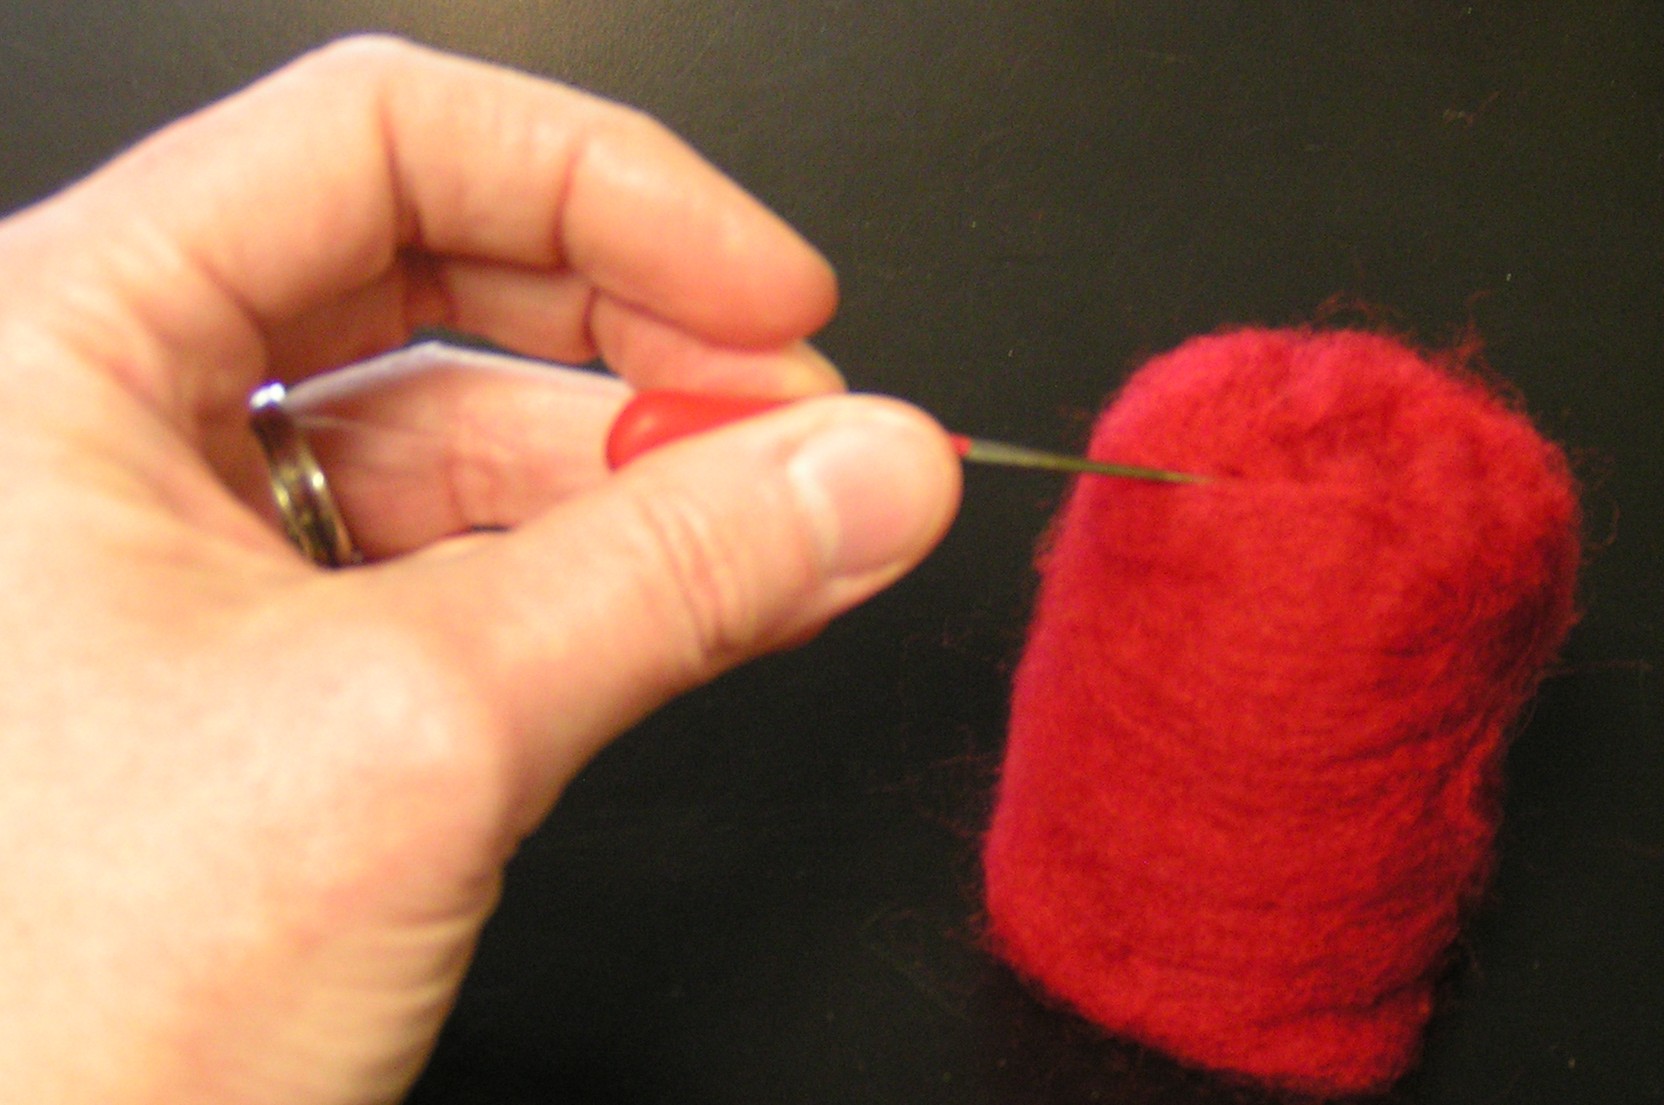
Needle felting is all about precision and creativity. This method involves using a barbed needle to sculpt the wool into your desired shape. – Select Your Wool: Choose high-quality wool roving for best results. – Shape the Wool: Start with a small amount of wool and roll it into a loose shape. – Needle the Wool: Use a felting needle to poke the wool repeatedly. This action tangles the fibers, gradually firming up the shape. – Refine the Shape: Continue needling until you achieve the desired firmness and detail. Be mindful of your fingers as the needles are sharp! Needle felting allows for intricate designs. Imagine sculpting a tiny mouse or fish with just a needle and wool—your cat will surely appreciate the effort! Both methods have their unique charm and benefits. Which one will you try first for your furry companion?Shaping The Toys
Shaping the toys is a fun and creative part of making felted wool cat toys. This stage transforms soft wool into playful shapes that cats will love. It requires simple tools and gentle hands. Start by forming the base shape, then add small details to make the toy interesting. The key is to work slowly and carefully, allowing the wool fibers to bind tightly. This process gives the toy strength and durability, perfect for active cats.
Forming Simple Shapes
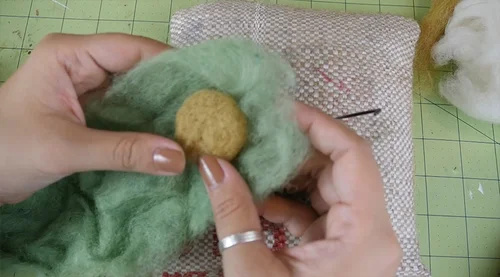
Begin with a small amount of wool. Roll it between your palms to create a ball or oval. Use felting needles to poke the wool. This action binds fibers together and firms the shape. Keep poking evenly to avoid lumps. For variety, try shapes like mice, fish, or balls. The size should fit comfortably in a cat’s paw. Use different colors to make each toy unique. Remember, simple shapes are easier to make and hold well.
Adding Details And Features
Once the base shape is firm, add small wool pieces for details. Use thin strips or tiny balls of wool. Attach eyes, ears, tails, or whiskers by felting them onto the toy. Focus on areas that catch the cat’s attention. Needle-felt carefully to avoid holes or loose parts. Use contrasting colors to highlight features. Adding texture with different wool types makes toys more interesting. These details bring the toys to life and increase play value.
Adding Cat-friendly Elements
Adding cat-friendly elements to your felted wool toys makes them more appealing and engaging for your feline friend. These extras can enhance playtime and keep your cat interested longer. Let’s look at simple ways to boost the fun factor in your handmade toys.
Incorporating Catnip
Catnip is a natural magnet for many cats. You can sprinkle dried catnip inside the wool before felting or sew a small pouch filled with catnip into the toy. This gives your cat a delightful scent to explore and can encourage playful behavior.
Try using organic catnip to avoid any chemicals that might bother your pet. Some cats respond more strongly than others, so watch how your cat reacts and adjust the amount accordingly. Have you noticed your cat’s eyes light up when they find a catnip toy?
Using Bells And Strings
Adding small bells inside the wool toy creates a fun jingling sound that can grab your cat’s attention. Make sure the bells are securely enclosed so your cat cannot swallow them. The noise adds a new layer of excitement during play.
Strings attached to the toy give your cat something to chase and bat around. Use sturdy, non-toxic yarn or twine and avoid anything that can fray easily. You can even create a few loose strands for extra movement, making the toy more interactive and stimulating.
Have you tried combining sound and movement in your cat’s toys before? Mixing these elements can turn a simple felted ball into a fascinating plaything your cat won’t want to put down.
Finishing Touches
Finishing touches are what turn your felted wool cat toys from simple shapes into durable, playful treasures. These final steps ensure the toy holds together well and looks neat. Paying attention here makes your effort last longer and keeps your cat entertained safely.
Securing Loose Fibers
Loose fibers can unravel and create a mess for your cat to swallow. To avoid this, gently press and roll the toy between your palms, tightening the wool. If you notice stubborn loose ends, use a felting needle to poke them back into the surface carefully.
Another trick I found useful is brushing the toy lightly with a soft brush after felting. This smooths out stray fibers without damaging the shape. Do you check your toys for loose fibers before giving them to your cat? It’s a simple step that prevents wear and tear.
Drying And Setting
Proper drying is crucial for your toy to keep its form. After felting, squeeze out excess water with a towel but don’t wring it, which can distort the shape. Then, let the toy air dry completely in a warm spot away from direct sunlight.
Once dry, you can reshape the toy gently if needed. I place mine on a flat surface and press lightly to set the form. Have you noticed how a well-dried toy feels firmer and lasts longer? This small care step can make all the difference in your cat’s playtime experience.
Safety Tips
Keeping your cat safe while playing with felted wool toys is essential. Even the cutest handmade toys can pose risks if you’re not careful. Paying attention to safety helps you avoid any unexpected vet visits and lets your furry friend enjoy the fun worry-free.
Choosing Safe Materials
Not all wool or crafting supplies are safe for pets. Use 100% natural wool without any chemical dyes or treatments. Synthetic fibers can cause allergic reactions or digestive problems if your cat chews or swallows pieces.
Avoid small parts like buttons or beads that can come off and become choking hazards. Instead, try felting colorful wool into the toy itself to add interest without loose pieces. Think about what your cat might bite or swallow and keep those risks out of your design.
Supervising Playtime
Even the safest toys need supervision, especially with energetic cats. Watch how your cat interacts with the toy at first to spot any signs of tearing or chewing apart. If the toy starts to fall apart, take it away immediately to prevent swallowing wool bits.
Do you notice your cat getting overly aggressive with certain toys? It might be time to switch to sturdier options or save those toys for supervised sessions only. Your attention during playtime is the best way to keep your pet safe and happy.

Credit: feltingandfiberstudio.com
Troubleshooting Common Issues
Creating felted wool cat toys can sometimes lead to unexpected challenges. You might find your toys losing their shape or shedding wool, which can be frustrating. Understanding how to troubleshoot these issues helps you craft durable and attractive toys your cat will love.
Fixing Shape Problems
If your felted toy looks lumpy or uneven, it means the wool hasn’t felted evenly. Adding more soap and warm water while gently rubbing the toy can help even out the surface. Be patient; sometimes, it takes several rounds of rolling and shaping to get a smooth finish.
Have you noticed your toy losing its firmness quickly? Try applying firmer pressure when rolling the wool. Using a bamboo mat or bubble wrap can also help you shape the toy better without damaging the fibers.
Preventing Wool Shedding
Shedding wool can be messy and reduce the toy’s lifespan. To minimize shedding, make sure you use tightly packed wool during felting. Thin layers of wool felt better and stick together more firmly, preventing loose fibers from escaping.
After felting, rinse the toy well in cold water to set the fibers. A quick tumble in the dryer on low heat can also help tighten the wool. Have you tried brushing the toy gently with a soft brush? This can remove loose fibers before your cat gets to them.
Customizing Your Toys
Customizing your felted wool cat toys adds a personal touch. It allows you to create unique and engaging playthings for your feline friend. You can tailor the toys to suit your cat’s preferences and your home décor. This section explores how to use colors and shapes to make delightful toys.
Using Different Colors
Color is an easy way to customize your cat toys. Choose bright and bold colors to capture your cat’s attention. Soft pastels can create a calming effect. You can use a single color or mix several for a vibrant look. Try using natural dyes for an eco-friendly option. Consider your cat’s favorite colors and match them to the toys.
Experimenting With Shapes
Shapes can make toys more intriguing for your cat. Simple shapes like balls and cubes are easy to create. Try experimenting with more complex shapes like fish or mice. Unique shapes can offer different textures and challenge your cat. Ensure the shapes are safe and free of sharp edges. You can also combine shapes for a multi-functional toy.
Credit: www.chezlin.com
Storage And Care
Taking care of your felted wool cat toys is just as important as making them. Proper storage and cleaning not only keep the toys looking fresh but also ensure they last through countless play sessions. You want your furry friend to enjoy safe and clean toys every day.
Cleaning Felted Toys
Felted wool toys are delicate, so avoid harsh washing methods. Hand wash them gently using cool water and a mild soap or wool detergent. Rinse thoroughly to remove all soap, then press out excess water without wringing.
Air dry the toys flat on a towel, reshaping if needed. Avoid direct sunlight or heat sources, which can cause shrinking or warping. Spot clean small stains with a damp cloth to keep the toys looking their best between washes.
Storing For Longevity
Store your felted toys in a dry, cool place away from direct sunlight and moisture. A breathable fabric bag or a small basket works well to prevent dust buildup while allowing air circulation. Avoid plastic bags, which can trap moisture and cause mildew.
Consider rotating toys regularly to prevent wear from constant use. Keeping some toys out of reach until later also keeps your cat curious and excited. How often do you switch out your pet’s toys to keep playtime fresh?
Frequently Asked Questions
What Materials Are Needed For Felted Wool Cat Toys?
You need wool roving, soap, warm water, and a mesh bag. Optional items include catnip and small bells. These materials help create durable, safe, and engaging felted toys for cats.
How Do You Felt Wool For Cat Toys?
Wet wool roving with soapy warm water, then rub it gently. Repeat until fibers mat together and form a firm shape. This process creates soft, durable felt ideal for cat toys.
Are Felted Wool Toys Safe For Cats?
Yes, felted wool toys are safe if made with natural, non-toxic wool. Avoid synthetic fibers and small parts that can be swallowed. Always supervise your cat while playing for safety.
Can I Add Catnip To Felted Wool Toys?
Yes, adding catnip inside felted wool toys enhances playtime. Seal catnip securely inside during felting to prevent spills. Catnip attracts cats and encourages active, healthy play.
Conclusion
Making felted wool cat toys is fun and simple. You only need a few materials and some patience. These toys keep your cat happy and active. They also last long and are safe to use. Try different shapes and colors to find what your cat likes.
Handmade toys add a personal touch to playtime. Enjoy crafting and watching your cat enjoy the new toys. Give it a try today!

Leave a Reply