Looking for a fun and simple way to spoil your cat? Making a mouse cat toy with crochet is easier than you think, and your furry friend will love it!
You don’t need fancy materials or advanced skills—just a few basic supplies and some time. Imagine seeing your cat chase, pounce, and play with a toy you made yourself. Ready to create something special that keeps your pet entertained for hours?
Let’s dive into the step-by-step guide that will have you crafting the perfect mouse toy in no time!
Materials Needed
Gathering the right materials sets the stage for creating a mouse cat toy that’s both fun and durable. Choosing quality supplies makes your crocheting smoother and ensures the toy lasts through many play sessions. Let’s look at what you need before you start crocheting.
Yarn Selection
Pick yarn that feels soft but strong. Acrylic yarn is a great choice because it’s easy to clean and holds up well to scratches. Cotton yarn works too if you want something natural and breathable.
Think about your cat’s safety—avoid yarns that shed easily or have loose fibers. Bright colors catch a cat’s eye, but neutral tones can blend better with your home decor. What color do you think your cat would chase first?
Crochet Hook Size
The hook size should match your yarn thickness to get a tight stitch. A 3.5mm or 4mm hook usually works well with medium-weight yarn. If your stitches are too loose, the stuffing might peek through, so adjust accordingly.
Using the right hook size saves time and frustration. Have you noticed how a slightly bigger or smaller hook changes the toy’s texture?
Stuffing Options
Stuffing keeps the toy soft and squeezable. Polyester fiberfill is popular because it’s lightweight and washable. Alternatively, you can use scrap yarn or fabric pieces to recycle materials.
Some people add a small bell or catnip inside for extra fun. Would your cat prefer a silent toy or one that jingles?
Additional Accessories
Adding small accessories can make the toy more appealing. Consider using embroidery thread to stitch on eyes and nose securely. Avoid buttons or beads that might come off and pose a choking hazard.
Feathers or ribbons attached safely can invite your cat to bat and chase. What textures does your cat love to paw at most?
Credit: 1001patterns.com
Basic Crochet Stitches
Basic crochet stitches form the foundation of any crochet project. Understanding these stitches helps create neat and durable toys. They are simple to learn and easy to practice. Each stitch builds on the last, creating a solid structure. Mastering these basics ensures your mouse cat toy looks great and lasts long.
Slip Knot And Chain Stitch
The slip knot starts every crochet project. Make a loop and pull the yarn through to secure it. The chain stitch follows. It creates the base row for your work. Yarn over the hook and pull through the loop. Repeat to make the desired chain length. Chains set the shape and size of the toy.
Single Crochet
Single crochet is a tight, firm stitch. Insert the hook into a stitch, yarn over, and pull through. Then yarn over again and pull through both loops on the hook. This stitch creates a dense fabric that holds stuffing well. It is perfect for making small toys like a mouse cat toy.
Increasing And Decreasing
Increasing adds stitches to widen your work. Crochet two stitches in one stitch to increase. Decreasing reduces stitches to shape the toy. Insert the hook into two stitches, yarn over, and pull through all loops. These techniques form the curves and details of the mouse. They help give the toy its cute shape.
Creating The Mouse Body
Creating the mouse body is a crucial part of your crochet cat toy. This shape not only defines the toy’s look but also how your cat will interact with it. Focusing on the mouse body ensures the toy is both appealing and durable for playtime.
Starting The Base
Begin by making a small magic ring to keep the base tight and neat. This ring forms the foundation of your mouse body, so keeping your stitches even is key. Use single crochet stitches to work around the ring, gradually increasing the number of stitches in each round.
Try to count your stitches as you go. It’s easy to lose track and end up with an uneven base. A smooth, round start helps the toy sit nicely and feel comfortable for your cat to grab.
Shaping The Body
After establishing the base, start building the body by working in continuous rounds. Add stitches to widen the body, then reduce them to taper the shape. This technique creates a soft, oval shape that looks like a mouse.
Pay attention to your stitch tension here. Too tight and the toy becomes stiff; too loose and the stuffing might show through. Adjust your hook size if needed to get that perfect balance.
Closing The End
Once the mouse body reaches the desired size, it’s time to close it up. Begin decreasing stitches evenly to bring the opening together. Leave a small gap for stuffing before pulling the yarn tight to seal the end.
Stuff the mouse body firmly but not too much—you want it soft enough for your cat to bite and toss. Have you noticed how a well-stuffed toy lasts longer and keeps your cat’s interest better? That final stitch is key to keeping everything secure.

Credit: www.youtube.com
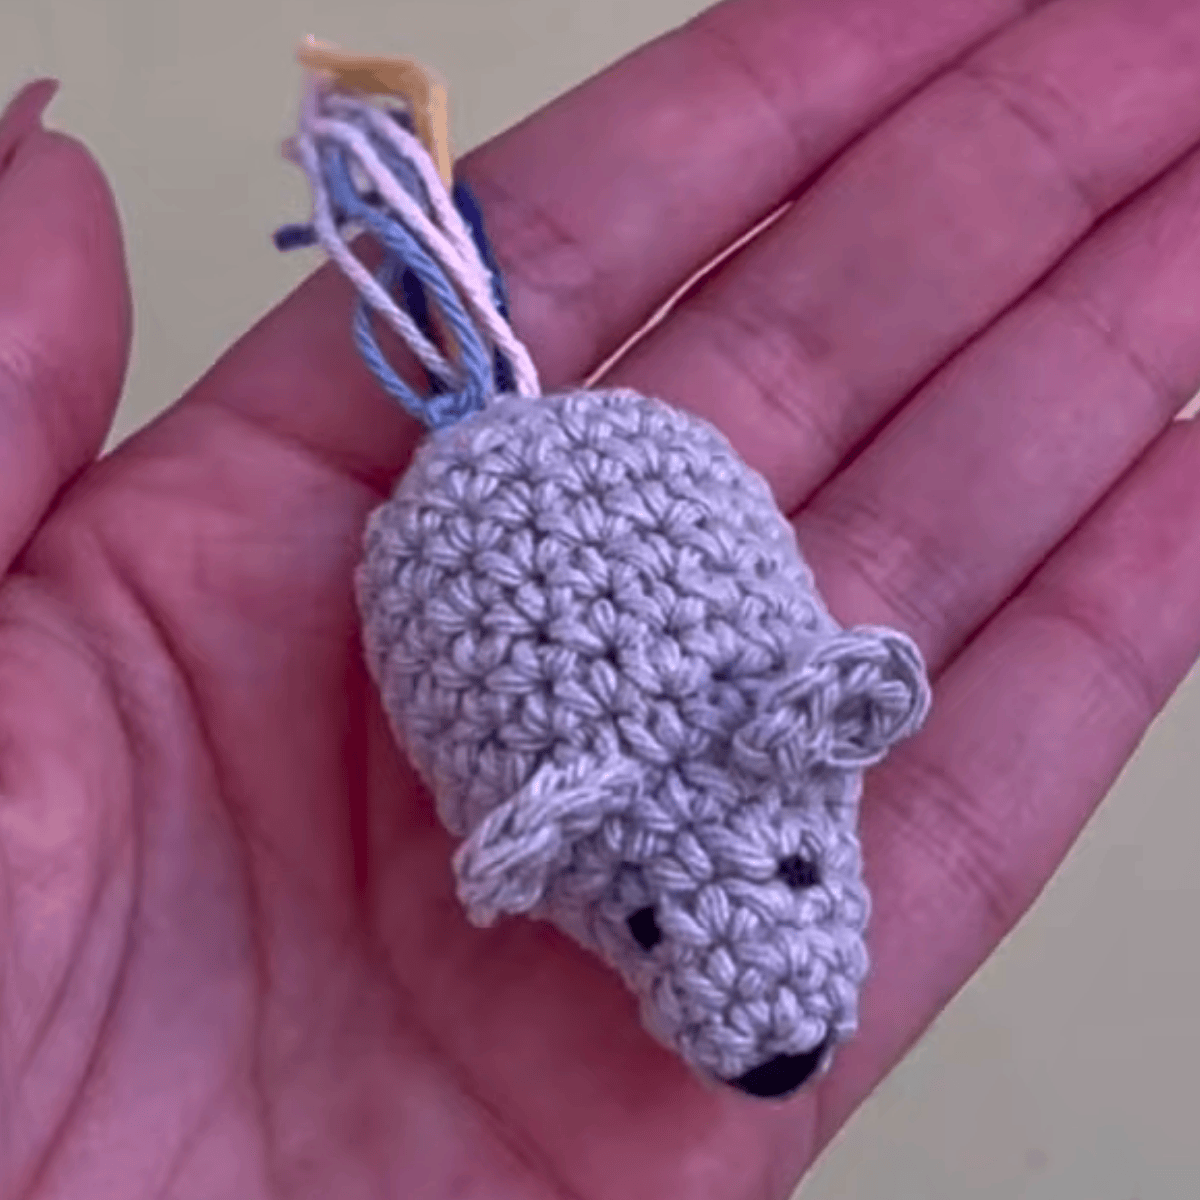
Making The Ears And Tail
Making the ears and tail adds charm to your crochet mouse cat toy. These small parts bring the toy to life and make it more fun for your cat. Focus on simple shapes and soft yarn for comfort and durability. Use basic stitches to keep the process easy and quick.
Crocheting The Ears
Start with a small magic ring to form the ear base. Use single crochet stitches to create a round shape. Increase stitches gradually to widen the ear. Stop increasing once the ear reaches the desired size.
- Work in rounds with even stitches
- Use soft yarn for a gentle touch
- Create two identical ears for balance
Finish each ear by fastening off and leaving a long tail for sewing.
Attaching The Ears
Position the ears evenly on the mouse’s head. Use the yarn tails and a yarn needle to sew them securely. Stitch around the base of each ear to keep it stable. Make sure ears stand upright for a lively look.
- Pin ears before sewing to check placement
- Use small, tight stitches for durability
- Hide yarn ends inside the head after sewing
Crafting The Tail
The tail is a simple and fun addition. Chain the desired length for the tail. Work single crochet stitches back along the chain to make it thicker. Use a yarn color that contrasts or matches the body.
- Keep the tail flexible for play
- Use a tight stitch for strength
- Leave a long yarn end for attaching
Sew the tail to the back of the mouse securely. Make sure it is firmly attached to avoid detaching during play.
Adding Details
Adding details to your mouse cat toy crochet enhances its charm. These tiny touches make the toy more attractive and fun. Let’s explore how to add some delightful details.
Eyes And Nose Embroidery
Embroidering eyes and nose gives the mouse character. Use black yarn for the eyes. A simple knot can create the perfect size. For the nose, use pink or red yarn. Stitch a small triangle for a cute look. Keep stitches tight for durability.
Optional Whiskers
Whiskers add realism to your crochet mouse. Cut thin yarn strands. Choose black or white for visibility. Sew them just above the nose. Secure them tightly to prevent loose ends. Trim to your desired length.
Decorative Touches
Enhance your crochet toy with additional decorations. Add a tiny bow made from ribbon. Sew it near the mouse’s neck for a charming look. Choose colorful yarn for a striped tail. Patterns can make your toy unique. Experiment with different color combinations.
Finishing Touches
Finishing touches make your mouse cat toy complete and safe for play. These final steps ensure the toy is soft, secure, and durable. Pay close attention to details for a polished look and long-lasting fun.
Stuffing The Toy
Choose soft, non-toxic stuffing for your toy. Fill the mouse evenly to keep its shape. Avoid overstuffing to keep it flexible and cuddly. Use small amounts at a time, pressing gently to spread the filling. This helps the toy feel natural in your cat’s paws.
Sewing Parts Together
Use a strong, matching thread for sewing. Attach ears, tail, and other parts firmly. Use small, tight stitches to prevent loose seams. Sew inside edges carefully for a neat finish. Double stitch areas that may get extra tugging.
Securing Loose Ends
Tie off all thread ends with tight knots. Hide knots inside the toy to avoid chewing hazards. Trim extra thread close to the knots. Check the toy for any weak spots or loose yarn. Reinforce these areas before giving it to your cat.
Tips For Durability
Making a mouse cat toy crochet is fun and rewarding. Durability is key to keep your cat entertained longer. Strong materials and careful stitching help the toy last. Safety also matters to protect your cat from harm. Here are some tips to make your toy tough and safe.
Using Strong Yarn
Choose yarn made from cotton or acrylic. These materials resist wear and tear well. Avoid delicate or fuzzy yarn that frays easily. Thick yarn helps the toy keep its shape. Dark colors hide dirt and stains better.
Reinforcing Seams
Sew seams tightly to prevent stuffing from escaping. Use double stitching around edges for extra strength. Knot ends securely to stop unraveling. Check seams regularly and repair small holes fast.
Safe Toy Practices
- Use non-toxic yarn and stuffing materials.
- Avoid small parts that cats can swallow.
- Inspect toys often for damage and remove if unsafe.
- Supervise playtime to prevent accidents.
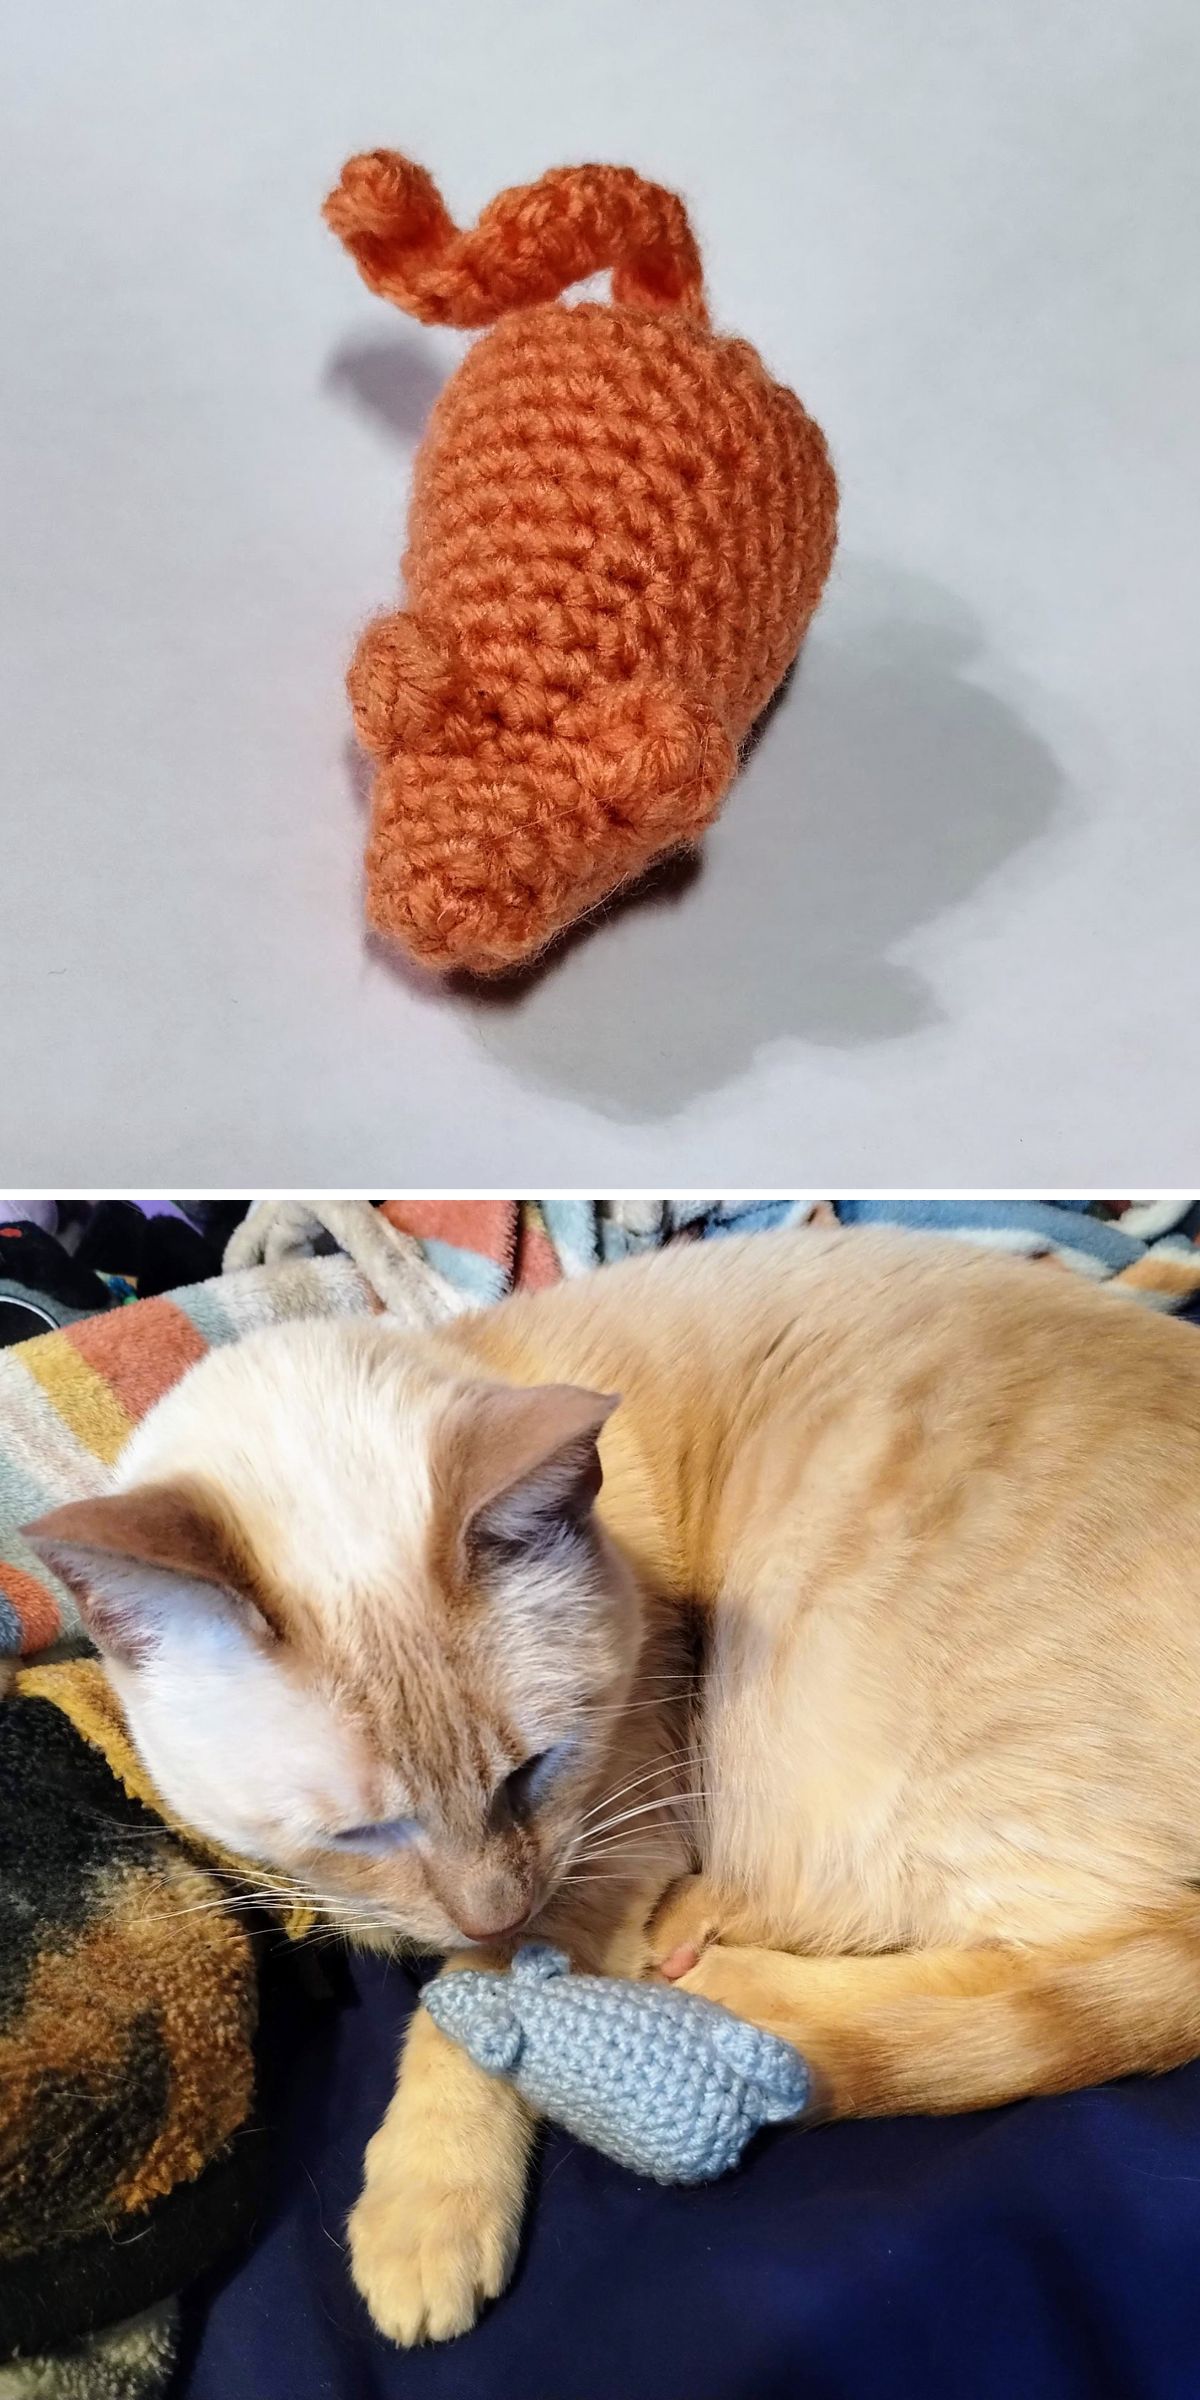
Customizing Your Toy
Choose yarn colors and patterns to give your mouse cat toy a unique look. Personalize size and shape to suit your cat’s play style. Add small details like eyes or whiskers for extra charm.
Customizing Your Toy Creating a crochet mouse cat toy is a delightful project, but adding a personal touch can make it even more special for your feline friend. Customization not only enhances the toy’s appeal but also allows you to cater to your cat’s unique preferences. Whether it’s through color, scent, or size, these adjustments can make all the difference in your cat’s playtime experience.Color Variations
Choosing the right color for your mouse toy can add an element of fun and personality. If your cat is intrigued by bright colors, consider using vibrant yarns like electric blue or sunny yellow. Alternatively, if you prefer a more natural look, opt for earthy tones such as browns or grays. Mix and match colors to create patterns or stripes, adding a visually stimulating element to the toy. Remember, the color doesn’t just please your cat’s eyes—it can also make the toy easier to spot when it’s flung across the room!Adding Catnip
Infusing your crochet mouse with catnip can elevate your cat’s interest in the toy. Simply place a small pouch of dried catnip inside the toy before sealing it. This aromatic herb can be a game-changer, especially for cats who are particularly responsive to its scent. Use fresh, high-quality catnip to ensure maximum potency. If you’re worried about the mess, consider using a catnip spray to lightly coat the exterior of the toy instead.Size Adjustments
Not all cats are the same size, and neither should their toys be. Adjusting the size of your crochet mouse can make it more appealing and manageable for your cat. If you have a kitten, a smaller toy will be easier for it to bat around. For larger cats, increase the toy’s dimensions to provide a more satisfying play experience. Always ensure that the size adjustments don’t compromise the structural integrity of your crochet work. Have you ever noticed your cat’s reaction to different toy sizes? Making these small adjustments can lead to big differences in playtime enjoyment.
Credit: www.sweetsofties.com
Frequently Asked Questions
What Materials Are Needed For A Crochet Mouse Cat Toy?
You need yarn, a crochet hook, stuffing, a yarn needle, and scissors. Choose soft, durable yarn for safety. Optional: small bells or catnip for added fun.
How Long Does It Take To Crochet A Mouse Cat Toy?
Crocheting a mouse cat toy typically takes 1 to 2 hours. Time depends on your skill level and the toy’s complexity. Beginners may take longer to finish.
Is Crochet Safe For Cats To Play With?
Yes, crochet toys are safe if made with non-toxic yarn. Avoid small parts that can be swallowed. Always supervise your cat during playtime.
Can I Add Catnip To The Crochet Mouse Toy?
Yes, adding catnip inside the toy makes it more enticing. Use dried catnip or catnip-filled sachets. Ensure the toy is securely closed to avoid spills.
Conclusion
Making a mouse cat toy with crochet brings joy to your pet. It uses simple stitches anyone can learn. This toy keeps cats active and happy every day. Using soft yarn makes it safe and fun to play. You save money by crafting your own cat toy.
Plus, it adds a personal touch your cat will love. Try this easy project and watch your cat enjoy it. Crafting creates a special bond between you and your cat. Give your pet a handmade gift that lasts long.


Leave a Reply